<?xml version="1.0" encoding="utf-8"?><feed xmlns="http://www.w3.org/2005/Atom" ><generator uri="https://jekyllrb.com/" version="4.4.1">Jekyll</generator><link href="https://pioto.org/blog/feed.xml" rel="self" type="application/atom+xml" /><link href="https://pioto.org/" rel="alternate" type="text/html" /><updated>2026-02-24T21:26:42-05:00</updated><id>https://pioto.org/blog/feed.xml</id><title type="html">Mike Kelly</title><subtitle>Personal homepage of Mike Kelly (pioto)</subtitle><author><name>pioto</name></author><entry><title type="html">Linux Disk Encryption in 2022</title><link href="https://pioto.org/blog/2022/03/linux-disk-encryption-in-2022.html" rel="alternate" type="text/html" title="Linux Disk Encryption in 2022" /><published>2022-03-03T18:24:41-05:00</published><updated>2022-05-17T16:55:58-04:00</updated><id>https://pioto.org/blog/2022/03/linux-disk-encryption-in-2022</id><content type="html" xml:base="https://pioto.org/blog/2022/03/linux-disk-encryption-in-2022.html"><![CDATA[<p><strong>UPDATE</strong>: as of Fedora 36, the below doesn’t seem to work correctly. You’ll
want to remove the <code class="language-plaintext highlighter-rouge">/etc/dracut.conf.d/tss2.conf</code> file, and the
<code class="language-plaintext highlighter-rouge">tpm2-device=auto,discard</code> from <code class="language-plaintext highlighter-rouge">/etc/crypttab</code>, or the initrd build will not
work, and your Fedora 36 kernel won’t boot. I was able to boot into one of my
old Fedora 35 kernels, make the above changes, and then run
<code class="language-plaintext highlighter-rouge">sudo dracut -f --kver 5.17.6-300.fc36.x86_64</code> (check, as that specific version
may change by the time you read this) to get things bootable. This loses the TPM
based decryption.</p>

<p>I recently picked up a new <a href="https://frame.work/">Framework</a> laptop to replace my aging Chromebook,
so I’m back on a “real” Linux laptop for the first time in nearly a decade.</p>

<p>That meant it was time to revisit <a href="../../2007/12/encrypting_your_home.html">a</a>
<a href="../../2008/05/encrypting_almost_your_entire.html">few</a>
<a href="../../2008/12/encrypting_almost_your_entire_1.html">old</a>
<a href="../../2009/02/disk_encryption_w_dm-crypt_luks_and_lvm2_part_3.html">blog</a>
<a href="../../2009/02/disk_encryption_w_dm-crypt_luk.html">posts</a>.</p>

<p>This time, though, I’m running Fedora, so all the work above gets replaced with a single checkbox
in the installer!</p>

<p>But my new laptop has a TPM chip, so I can make this even more painless using
<a href="https://www.freedesktop.org/software/systemd/man/systemd-cryptenroll.html"><code class="language-plaintext highlighter-rouge">systemd-cryptenroll</code></a>.
The Fedora installer prompts for a passphrase which I have to enter at every boot. But, if the
system hasn’t changed significantly (e.g. from UEFI firmware or Linux kernel updates), then the TPM
chip can handle unlocking things on my behalf.</p>

<p>I found <a href="https://lists.fedoraproject.org/archives/list/users@lists.fedoraproject.org/message/XX37KGE5ECR7AQMZN7E4OCA7RX6SM5PE/">a fedora-users mailing list post</a>
that gave me the most succinct version of things to get working. Key parts:</p>

<ul>
  <li>Use <code class="language-plaintext highlighter-rouge">systemd-cryptenroll --tpm2-device=auto -tpm2-pcrs=0+7 /dev/$DEVICE</code> to enroll an additional token
to unlock the LUKS volume. In my case, <code class="language-plaintext highlighter-rouge">$DEVICE</code> was <code class="language-plaintext highlighter-rouge">/dev/nvme0n1p3</code>, but your mileage may vary.
This would be the block device backing your LUKS volume. <code class="language-plaintext highlighter-rouge">lsblk</code> should make it clear.</li>
  <li>Edit <code class="language-plaintext highlighter-rouge">/etc/crypttab</code>, and change the end of the one line (starting with <code class="language-plaintext highlighter-rouge">luks-$UUID</code>) to
<code class="language-plaintext highlighter-rouge">tpm2-device=auto,discard</code></li>
  <li>Until Fedora uses Dracut 056 (see <a href="https://bugzilla.redhat.com/show_bug.cgi?id=1976462">#1976462</a>),
you need to create a file called <code class="language-plaintext highlighter-rouge">/etc/dracut.conf.d/tss2.conf</code>, with this in it:
    <div class="language-plaintext highlighter-rouge"><div class="highlight"><pre class="highlight"><code>install_optional_items+=" /usr/lib64/libtss2* /usr/lib64/libfido2.so.* "
</code></pre></div>    </div>
    <p>then run <code class="language-plaintext highlighter-rouge">sudo dracut -f</code></p>
  </li>
  <li>Reboot, and enjoy a fancy secure boot experience!</li>
</ul>

<p>Of course, if your threat model includes state actors or the like, this may not be the right choice
to make, but if you’re just wanting to make sure that your system is relatively secure if stolen,
and that your boot disk is basically gibberish whenever you dispose of it some day, then I think
this is a pretty good compromise.</p>]]></content><author><name>pioto</name></author><summary type="html"><![CDATA[UPDATE: as of Fedora 36, the below doesn’t seem to work correctly. You’ll want to remove the /etc/dracut.conf.d/tss2.conf file, and the tpm2-device=auto,discard from /etc/crypttab, or the initrd build will not work, and your Fedora 36 kernel won’t boot. I was able to boot into one of my old Fedora 35 kernels, make the above changes, and then run sudo dracut -f --kver 5.17.6-300.fc36.x86_64 (check, as that specific version may change by the time you read this) to get things bootable. This loses the TPM based decryption.]]></summary></entry><entry><title type="html">Minecraft Server on AWS</title><link href="https://pioto.org/blog/2020/05/minecraft-server-on-aws.html" rel="alternate" type="text/html" title="Minecraft Server on AWS" /><published>2020-05-23T18:25:00-04:00</published><updated>2020-05-23T18:25:00-04:00</updated><id>https://pioto.org/blog/2020/05/minecraft-server-on-aws</id><content type="html" xml:base="https://pioto.org/blog/2020/05/minecraft-server-on-aws.html"><![CDATA[<p>To help make the current COVID-19-related social distancing a little
less bad for my son, I’ve set up a private minecraft server for him to
use with his friends.</p>

<p>I could have just paid Mojang the $7.99/month for Realms, but I decided
to use this as a learning exercise.</p>

<p>So, I baked up an <a href="https://aws.amazon.com/cloudformation/">AWS CloudFormation</a>
template to spin up a minimal viable server.</p>

<p>You can find the full template on its <a href="https://github.com/pioto/minecraft-bedrock-cf-stack">GitHub
Project</a>.</p>

<p>In the designer, it looks like this:</p>

<p><img src="/assets/blog/2020-05-23-minecraft-server-on-aws/template1-designer.png" alt="Template Designer View" /></p>

<p>There’s just a few moving parts here:</p>

<ul>
  <li>An <a href="https://aws.amazon.com/ec2/">EC2</a> instance to run the server itself</li>
  <li>A <a href="https://docs.aws.amazon.com/vpc/latest/userguide/VPC_SecurityGroups.html">Security group</a>
to act as a firewall to limit access to it</li>
  <li>An <a href="https://docs.aws.amazon.com/AWSEC2/latest/UserGuide/elastic-ip-addresses-eip.html">Elastic IP</a>
to keep a static IP for the server</li>
  <li>A <a href="https://aws.amazon.com/route53/">Route 53</a> record set, to point to
the server (so I have a simple name to give to my son’s friends’
parents)</li>
  <li>A custom record from the <a href="https://docs.aws.amazon.com/solutions/latest/instance-scheduler-on-aws/welcome.html">AWS Instance
Scheduler</a>, so that
we can have the server stop automatically at bed time, and start up
again the next day (saving cost as well as being a parental control of
sorts)</li>
</ul>

<p>So, this stack has to be deployed along with the <a href="https://docs.aws.amazon.com/solutions/latest/instance-scheduler-on-aws/welcome.html">Instance
Scheduler</a>,
and it assumes that you called that stack “instance-scheduler” (should
probably parameterize that). But, hopefully this is useful to someone
else.</p>

<p>Some tasks to do in the future:</p>

<ul>
  <li>Get the server to update to the latest minecraft server automatically</li>
  <li>Push some of the configuration into the template: right now, the
template starts the EC2 instance but doesn’t auto-start the server.
It’s expected that you’ll want to customize the server.properties
before starting it the first time. Then, you can enable it with <code class="language-plaintext highlighter-rouge">sudo
systemctl enable minecraft-bedrock-server.service</code> and start it with
<code class="language-plaintext highlighter-rouge">sudo systemctl start minecraft-bedrock-server.service</code></li>
</ul>]]></content><author><name>pioto</name></author><summary type="html"><![CDATA[Explaining how I'm running a private Minecraft (Bedrock) Server on AWS]]></summary><media:thumbnail xmlns:media="http://search.yahoo.com/mrss/" url="https://pioto.org/assets/blog/2020-05-23-minecraft-server-on-aws/template1-designer.png" /><media:content medium="image" url="https://pioto.org/assets/blog/2020-05-23-minecraft-server-on-aws/template1-designer.png" xmlns:media="http://search.yahoo.com/mrss/" /></entry><entry><title type="html">Wunderground Datacollection in OpenNMS</title><link href="https://pioto.org/blog/2018/06/wunderground-datacollection-opennms.html" rel="alternate" type="text/html" title="Wunderground Datacollection in OpenNMS" /><published>2018-06-12T20:54:00-04:00</published><updated>2018-06-12T20:54:00-04:00</updated><id>https://pioto.org/blog/2018/06/wunderground-datacollection-opennms</id><content type="html" xml:base="https://pioto.org/blog/2018/06/wunderground-datacollection-opennms.html"><![CDATA[<p>I’ve become a fan of <a href="https://opennms.org/">OpenNMS</a> as a general purpose monitoring and datacollection platform.</p>

<p>It has a lot of “enterprise” features that I don’t need for most of my personal stuff, but (IMHO) it does a better
job of doing basic service monitoring, performance metric collection, etc than things like Nagios (or other
<a href="https://gitlab.com/pioto/pioto-monitors">hacks</a> I’ve made in the past).</p>

<p>One thing I’ve done with it is start to collect my local weather data, so that I can graph it side-by-side with
data pulled from my thermostat, etc.</p>

<p>Unfortunately, the Weather Underground API is <del><a href="https://www.wunderground.com/weather/api/">no longer free</a> (“as in
beer”)</del> <a href="https://web.archive.org/web/20180612205400/https://apicommunity.wunderground.com/weatherapi/topics/end-of-service-for-the-weather-underground-api">no longer available</a>, but hopefully this serves as an example of the sort of stuff you can do with OpenNMS.</p>

<hr />

<p>OpenNMS is able to collect data from a number of sources, including SNMP, and basically anything you get fetch over
HTTP.</p>

<p>To get data from Wunderground, we’ll use the <a href="https://docs.opennms.org/opennms/releases/latest/guide-admin/guide-admin.html#_xmlcollector"><code class="language-plaintext highlighter-rouge">XmlCollector</code></a>.
Despite its name, it can also work with JSON, though in this case, Wunderground gives us XML anyways.</p>

<p>We need to update <code class="language-plaintext highlighter-rouge">collectd-configuration.xml</code> with two new parts:</p>

<div class="language-xml highlighter-rouge"><div class="highlight"><pre class="highlight"><code>   <span class="nt">&lt;package</span> <span class="na">name=</span><span class="s">"wunderground-conditions"</span> <span class="na">remote=</span><span class="s">"false"</span><span class="nt">&gt;</span>
      <span class="nt">&lt;filter&gt;</span>IPADDR != '0.0.0.0'<span class="nt">&lt;/filter&gt;</span>
      <span class="nt">&lt;include-range</span> <span class="na">begin=</span><span class="s">"1.1.1.1"</span> <span class="na">end=</span><span class="s">"254.254.254.254"</span><span class="nt">/&gt;</span>
      <span class="nt">&lt;include-range</span> <span class="na">begin=</span><span class="s">"::1"</span> <span class="na">end=</span><span class="s">"ffff:ffff:ffff:ffff:ffff:ffff:ffff:ffff"</span><span class="nt">/&gt;</span>
      <span class="nt">&lt;service</span> <span class="na">name=</span><span class="s">"Wunderground-Conditions"</span> <span class="na">interval=</span><span class="s">"300000"</span> <span class="na">user-defined=</span><span class="s">"true"</span> <span class="na">status=</span><span class="s">"on"</span><span class="nt">&gt;</span>
         <span class="nt">&lt;parameter</span> <span class="na">key=</span><span class="s">"collection"</span> <span class="na">value=</span><span class="s">"wunderground_conditions_home"</span><span class="nt">/&gt;</span>
         <span class="nt">&lt;parameter</span> <span class="na">key=</span><span class="s">"handler-class"</span> <span class="na">value=</span><span class="s">"org.opennms.protocols.xml.collector.DefaultXmlCollectionHandler"</span><span class="nt">/&gt;</span>
      <span class="nt">&lt;/service&gt;</span>
   <span class="nt">&lt;/package&gt;</span>
   <span class="c">&lt;!-- ... --&gt;</span>
   <span class="nt">&lt;collector</span> <span class="na">service=</span><span class="s">"Wunderground-Conditions"</span> <span class="na">class-name=</span><span class="s">"org.opennms.protocols.xml.collector.XmlCollector"</span><span class="nt">/&gt;</span>
</code></pre></div></div>

<p>This tells OpenNMS that, if we have a node configured with the “Wunderground-Conditions” service, it should trigger
this datacollection.</p>

<p>Next, we need to add some specific configuration for the <code class="language-plaintext highlighter-rouge">XmlCollector</code>, in <code class="language-plaintext highlighter-rouge">xml-datacollection-config.xml</code>:</p>

<div class="language-xml highlighter-rouge"><div class="highlight"><pre class="highlight"><code>    <span class="nt">&lt;xml-collection</span> <span class="na">name=</span><span class="s">"wunderground_conditions_home"</span><span class="nt">&gt;</span>
        <span class="nt">&lt;rrd</span> <span class="na">step=</span><span class="s">"300"</span><span class="nt">&gt;</span>
            <span class="nt">&lt;rra&gt;</span>RRA:AVERAGE:0.5:1:2016<span class="nt">&lt;/rra&gt;</span>
            <span class="nt">&lt;rra&gt;</span>RRA:AVERAGE:0.5:12:1488<span class="nt">&lt;/rra&gt;</span>
            <span class="nt">&lt;rra&gt;</span>RRA:AVERAGE:0.5:288:366<span class="nt">&lt;/rra&gt;</span>
            <span class="nt">&lt;rra&gt;</span>RRA:MAX:0.5:288:366<span class="nt">&lt;/rra&gt;</span>
            <span class="nt">&lt;rra&gt;</span>RRA:MIN:0.5:288:366<span class="nt">&lt;/rra&gt;</span>
        <span class="nt">&lt;/rrd&gt;</span>
        <span class="nt">&lt;xml-source</span> <span class="na">url=</span><span class="s">"http://api.wunderground.com/api/YOURAPIKEY/conditions/q/SOMEWHERE/Outthere.xml"</span><span class="nt">&gt;</span>
            <span class="nt">&lt;import-groups&gt;</span>xml-datacollection/wunderground.xml<span class="nt">&lt;/import-groups&gt;</span>
        <span class="nt">&lt;/xml-source&gt;</span>
    <span class="nt">&lt;/xml-collection&gt;</span>
</code></pre></div></div>

<p>Here, the “name” of the collection matches up with the paramter we defined in the Collectd config.</p>

<p>If you’re lucky enough to still have a Wunderground API key, you just need to put it in place of <code class="language-plaintext highlighter-rouge">YOURAPIKEY</code> above,
and change the rest of the query to be something like <code class="language-plaintext highlighter-rouge">/conditions/q/NY/New_York.xml</code>.</p>

<p>That tells OpenNMS where to get the data from, but we still need one more file to tell it how to parse the data,
and decide what to store. We put that in <code class="language-plaintext highlighter-rouge">xml-datacollection/wunderground.xml</code> (the <code class="language-plaintext highlighter-rouge">import-groups</code> entry above):</p>

<div class="language-xml highlighter-rouge"><div class="highlight"><pre class="highlight"><code><span class="nt">&lt;xml-groups&gt;</span>
   <span class="nt">&lt;xml-group</span> <span class="na">name=</span><span class="s">"wunderground_conditions"</span> <span class="na">resource-type=</span><span class="s">"node"</span> <span class="na">resource-xpath=</span><span class="s">"/response/current_observation"</span><span class="nt">&gt;</span>
      <span class="nt">&lt;xml-object</span> <span class="na">name=</span><span class="s">"temp_c"</span> <span class="na">type=</span><span class="s">"GAUGE"</span> <span class="na">xpath=</span><span class="s">"temp_c"</span><span class="nt">/&gt;</span>
      <span class="nt">&lt;xml-object</span> <span class="na">name=</span><span class="s">"temp_f"</span> <span class="na">type=</span><span class="s">"GAUGE"</span> <span class="na">xpath=</span><span class="s">"temp_f"</span><span class="nt">/&gt;</span>
      <span class="nt">&lt;xml-object</span> <span class="na">name=</span><span class="s">"UV"</span> <span class="na">type=</span><span class="s">"GAUGE"</span> <span class="na">xpath=</span><span class="s">"UV"</span><span class="nt">/&gt;</span>
      <span class="nt">&lt;xml-object</span> <span class="na">name=</span><span class="s">"dewpoint_c"</span> <span class="na">type=</span><span class="s">"GAUGE"</span> <span class="na">xpath=</span><span class="s">"dewpoint_c"</span><span class="nt">/&gt;</span>
      <span class="nt">&lt;xml-object</span> <span class="na">name=</span><span class="s">"dewpoint_f"</span> <span class="na">type=</span><span class="s">"GAUGE"</span> <span class="na">xpath=</span><span class="s">"dewpoint_f"</span><span class="nt">/&gt;</span>
      <span class="nt">&lt;xml-object</span> <span class="na">name=</span><span class="s">"feelslike_c"</span> <span class="na">type=</span><span class="s">"GAUGE"</span> <span class="na">xpath=</span><span class="s">"feelslike_c"</span><span class="nt">/&gt;</span>
      <span class="nt">&lt;xml-object</span> <span class="na">name=</span><span class="s">"feelslike_f"</span> <span class="na">type=</span><span class="s">"GAUGE"</span> <span class="na">xpath=</span><span class="s">"feelslike_f"</span><span class="nt">/&gt;</span>
      <span class="nt">&lt;xml-object</span> <span class="na">name=</span><span class="s">"heat_index_c"</span> <span class="na">type=</span><span class="s">"GAUGE"</span> <span class="na">xpath=</span><span class="s">"heat_index_c"</span><span class="nt">/&gt;</span>
      <span class="nt">&lt;xml-object</span> <span class="na">name=</span><span class="s">"heat_index_f"</span> <span class="na">type=</span><span class="s">"GAUGE"</span> <span class="na">xpath=</span><span class="s">"heat_index_f"</span><span class="nt">/&gt;</span>
      <span class="nt">&lt;xml-object</span> <span class="na">name=</span><span class="s">"precip_1hr_in"</span> <span class="na">type=</span><span class="s">"GAUGE"</span> <span class="na">xpath=</span><span class="s">"precip_1hr_in"</span><span class="nt">/&gt;</span>
      <span class="nt">&lt;xml-object</span> <span class="na">name=</span><span class="s">"precip_1hr_metric"</span> <span class="na">type=</span><span class="s">"GAUGE"</span> <span class="na">xpath=</span><span class="s">"precip_1hr_metric"</span><span class="nt">/&gt;</span>
      <span class="nt">&lt;xml-object</span> <span class="na">name=</span><span class="s">"precip_today_in"</span> <span class="na">type=</span><span class="s">"GAUGE"</span> <span class="na">xpath=</span><span class="s">"precip_today_in"</span><span class="nt">/&gt;</span>
      <span class="nt">&lt;xml-object</span> <span class="na">name=</span><span class="s">"precip_today_metric"</span> <span class="na">type=</span><span class="s">"GAUGE"</span> <span class="na">xpath=</span><span class="s">"precip_today_metric"</span><span class="nt">/&gt;</span>
      <span class="nt">&lt;xml-object</span> <span class="na">name=</span><span class="s">"pressure_in"</span> <span class="na">type=</span><span class="s">"GAUGE"</span> <span class="na">xpath=</span><span class="s">"pressure_in"</span><span class="nt">/&gt;</span>
      <span class="nt">&lt;xml-object</span> <span class="na">name=</span><span class="s">"pressure_mb"</span> <span class="na">type=</span><span class="s">"GAUGE"</span> <span class="na">xpath=</span><span class="s">"pressure_mb"</span><span class="nt">/&gt;</span>
      <span class="nt">&lt;xml-object</span> <span class="na">name=</span><span class="s">"visibility_km"</span> <span class="na">type=</span><span class="s">"GAUGE"</span> <span class="na">xpath=</span><span class="s">"visibility_km"</span><span class="nt">/&gt;</span>
      <span class="nt">&lt;xml-object</span> <span class="na">name=</span><span class="s">"visibility_mi"</span> <span class="na">type=</span><span class="s">"GAUGE"</span> <span class="na">xpath=</span><span class="s">"visibility_mi"</span><span class="nt">/&gt;</span>
      <span class="nt">&lt;xml-object</span> <span class="na">name=</span><span class="s">"wind_degrees"</span> <span class="na">type=</span><span class="s">"GAUGE"</span> <span class="na">xpath=</span><span class="s">"wind_degrees"</span><span class="nt">/&gt;</span>
      <span class="nt">&lt;xml-object</span> <span class="na">name=</span><span class="s">"wind_gust_kph"</span> <span class="na">type=</span><span class="s">"GAUGE"</span> <span class="na">xpath=</span><span class="s">"wind_gust_kph"</span><span class="nt">/&gt;</span>
      <span class="nt">&lt;xml-object</span> <span class="na">name=</span><span class="s">"wind_gust_mph"</span> <span class="na">type=</span><span class="s">"GAUGE"</span> <span class="na">xpath=</span><span class="s">"wind_gust_mph"</span><span class="nt">/&gt;</span>
      <span class="nt">&lt;xml-object</span> <span class="na">name=</span><span class="s">"wind_kph"</span> <span class="na">type=</span><span class="s">"GAUGE"</span> <span class="na">xpath=</span><span class="s">"wind_kph"</span><span class="nt">/&gt;</span>
      <span class="nt">&lt;xml-object</span> <span class="na">name=</span><span class="s">"wind_mph"</span> <span class="na">type=</span><span class="s">"GAUGE"</span> <span class="na">xpath=</span><span class="s">"wind_mph"</span><span class="nt">/&gt;</span>
      <span class="nt">&lt;xml-object</span> <span class="na">name=</span><span class="s">"windchill_c"</span> <span class="na">type=</span><span class="s">"GAUGE"</span> <span class="na">xpath=</span><span class="s">"windchill_c"</span><span class="nt">/&gt;</span>
      <span class="nt">&lt;xml-object</span> <span class="na">name=</span><span class="s">"windchill_f"</span> <span class="na">type=</span><span class="s">"GAUGE"</span> <span class="na">xpath=</span><span class="s">"windchill_f"</span><span class="nt">/&gt;</span>

      <span class="nt">&lt;xml-object</span> <span class="na">name=</span><span class="s">"display_location"</span> <span class="na">type=</span><span class="s">"String"</span> <span class="na">xpath=</span><span class="s">"display_location/full"</span><span class="nt">/&gt;</span>
   <span class="nt">&lt;/xml-group&gt;</span>
<span class="nt">&lt;/xml-groups&gt;</span>
</code></pre></div></div>

<p>That should “just work” for any Wundergroud location, and should tell OpenNMS to hold on to basically all of the numeric values
I saw in the results. All of that get stored in your time series database of choice (JRobin, RRDtool, or Newts).</p>

<p>It also holds onto the “display_location” string (just the latest value), which you can use to help
give a more meaningful label to your graphs.</p>

<p>
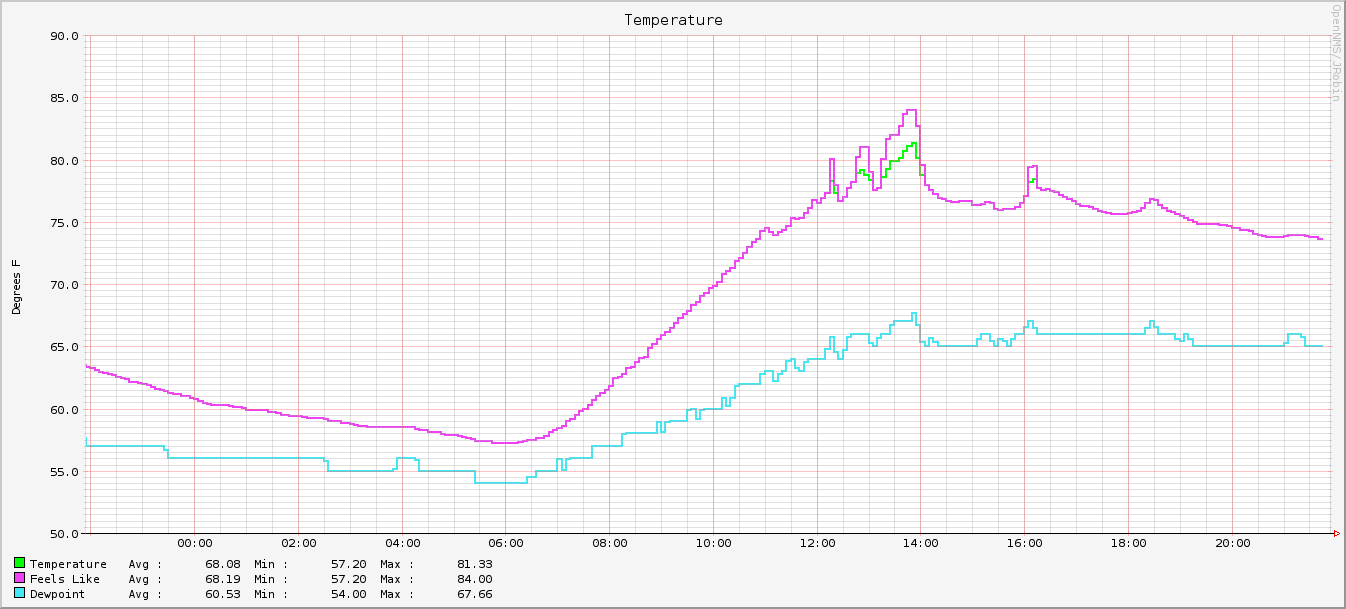
Finally, we’ll want to build a pretty graph to show that our datacollection is working:</p>

<div class="language-properties highlighter-rouge"><div class="highlight"><pre class="highlight"><code><span class="py">reports</span><span class="p">=</span><span class="s">wunderground.conditions.temp</span>

<span class="py">report.wunderground.conditions.temp.name</span><span class="p">=</span><span class="s">Temperature</span>
<span class="py">report.wunderground.conditions.temp.columns</span><span class="p">=</span><span class="s">temp_f,feelslike_f,dewpoint_f</span>
<span class="py">report.wunderground.conditions.temp.type</span><span class="p">=</span><span class="s">nodeSnmp</span>
<span class="py">report.wunderground.conditions.temp.command</span><span class="p">=</span><span class="s">--title="Temperature" </span><span class="se">\
</span>  <span class="s">--vertical-label="Degrees F" </span><span class="se">\
</span>  <span class="s">DEF:temp_f={rrd1}:temp_f:AVERAGE </span><span class="se">\
</span>  <span class="s">DEF:feelslike_f={rrd2}:feelslike_f:AVERAGE </span><span class="se">\
</span>  <span class="s">DEF:dewpoint_f={rrd3}:dewpoint_f:AVERAGE </span><span class="se">\
</span>  <span class="s">LINE2:temp_f#00ff00:"Temperature " </span><span class="se">\
</span>  <span class="s">GPRINT:temp_f:AVERAGE:"Avg </span><span class="se">\\</span><span class="s">: %10.2lf" </span><span class="se">\
</span>  <span class="s">GPRINT:temp_f:MIN:"Min </span><span class="se">\\</span><span class="s">: %10.2lf" </span><span class="se">\
</span>  <span class="s">GPRINT:temp_f:MAX:"Max </span><span class="se">\\</span><span class="s">: %10.2lf</span><span class="se">\\</span><span class="s">n" </span><span class="se">\
</span>  <span class="s">LINE2:feelslike_f#ee42f4:"Feels Like  " </span><span class="se">\
</span>  <span class="s">GPRINT:feelslike_f:AVERAGE:"Avg </span><span class="se">\\</span><span class="s">: %10.2lf" </span><span class="se">\
</span>  <span class="s">GPRINT:feelslike_f:MIN:"Min </span><span class="se">\\</span><span class="s">: %10.2lf" </span><span class="se">\
</span>  <span class="s">GPRINT:feelslike_f:MAX:"Max </span><span class="se">\\</span><span class="s">: %10.2lf</span><span class="se">\\</span><span class="s">n" </span><span class="se">\
</span>  <span class="s">LINE2:dewpoint_f#42e8f4:"Dewpoint    " </span><span class="se">\
</span>  <span class="s">GPRINT:dewpoint_f:AVERAGE:"Avg </span><span class="se">\\</span><span class="s">: %10.2lf" </span><span class="se">\
</span>  <span class="s">GPRINT:dewpoint_f:MIN:"Min </span><span class="se">\\</span><span class="s">: %10.2lf" </span><span class="se">\
</span>  <span class="s">GPRINT:dewpoint_f:MAX:"Max </span><span class="se">\\</span><span class="s">: %10.2lf</span><span class="se">\\</span><span class="s">n"</span>
</code></pre></div></div>

<p>That gets you a pretty little graph, like this:</p>

<p><img src="/assets/blog/2018-06-12-wunderground-datacollection-opennms/wunderground-graph.png" alt="Sample Weather Graph" /></p>

<p><strong>Updated 2019-03-06</strong>: note that the Wunderground API appears to be really and truly dead.</p>]]></content><author><name>pioto</name></author><summary type="html"><![CDATA[A brief writeup of how to collect your local weather data with OpenNMS.]]></summary><media:thumbnail xmlns:media="http://search.yahoo.com/mrss/" url="https://pioto.org/assets/blog/2018-06-12-wunderground-datacollection-opennms/wunderground-graph.png" /><media:content medium="image" url="https://pioto.org/assets/blog/2018-06-12-wunderground-datacollection-opennms/wunderground-graph.png" xmlns:media="http://search.yahoo.com/mrss/" /></entry><entry><title type="html">First Post in Foreverz</title><link href="https://pioto.org/blog/2016/09/first-post-in-foreverz.html" rel="alternate" type="text/html" title="First Post in Foreverz" /><published>2016-09-16T01:59:00-04:00</published><updated>2016-09-16T01:59:00-04:00</updated><id>https://pioto.org/blog/2016/09/first-post-in-foreverz</id><content type="html" xml:base="https://pioto.org/blog/2016/09/first-post-in-foreverz.html"><![CDATA[<p>It’s been a while since I’ve made any blog posts…</p>

<p>Here’s a quick update since <a href="../../2009/10/random_perl_hacking.html">the last time</a>:</p>

<ul>
  <li>I've changed jobs twice.</li>
  <li>I've had a bunch of kids.</li>
</ul>

<p>I also switched everything (both blog and website) over to a Jekyll site
about… 2 years ago.</p>

<p>I don’t have the time to contribute as much to open source as I used to, but
here’s a little tidbit.</p>

<h3 id="deploying-a-jekyll-blog-to-a-traditional-web-host-using-gitlab-ci">Deploying a Jekyll Blog to a Traditional Web Host, using GitLab CI</h3>

<p>I’ve been using <a href="https://about.gitlab.com/">GitLab</a> at work for a while now,
and it’s grown on me. I’ve recently managed to get my entire website fully
deployed by GitLab, both to a staging area with their
<a href="https://pages.gitlab.io/">Pages</a> tool, and to my ‘ole reliable <a href="https://www.pair.com/">pair
Networks</a> hosting account.</p>

<p>I still have to audit my repo before I can make it fully public, but here’s the
<code class="language-plaintext highlighter-rouge">.gitlab-ci.yml</code> I’m using:</p>

<div class="language-yaml highlighter-rouge"><div class="highlight"><pre class="highlight"><code><span class="c1"># This file is a template, and might need editing before it works on your project.</span>
<span class="c1"># Full project: https://gitlab.com/pages/jekyll</span>
<span class="na">image</span><span class="pi">:</span> <span class="s">ruby:2.3.1</span>

<span class="na">before_script</span><span class="pi">:</span>
  <span class="pi">-</span> <span class="s">bundle install</span>

<span class="na">test</span><span class="pi">:</span>
  <span class="na">stage</span><span class="pi">:</span> <span class="s">test</span>
  <span class="na">script</span><span class="pi">:</span>
  <span class="pi">-</span> <span class="s">bundle exec jekyll build -d test</span>
  <span class="na">artifacts</span><span class="pi">:</span>
    <span class="na">paths</span><span class="pi">:</span>
    <span class="pi">-</span> <span class="s">test</span>
  <span class="na">except</span><span class="pi">:</span>
  <span class="pi">-</span> <span class="s">master</span>

<span class="na">pages</span><span class="pi">:</span>
  <span class="na">stage</span><span class="pi">:</span> <span class="s">deploy</span>
  <span class="na">environment</span><span class="pi">:</span> <span class="s">staging</span>
  <span class="na">script</span><span class="pi">:</span>
  <span class="pi">-</span> <span class="s">bundle exec jekyll build -b /pioto-org -d public</span>
  <span class="na">artifacts</span><span class="pi">:</span>
    <span class="na">paths</span><span class="pi">:</span>
    <span class="pi">-</span> <span class="s">public</span>
  <span class="na">only</span><span class="pi">:</span>
  <span class="pi">-</span> <span class="s">master</span>

<span class="na">production</span><span class="pi">:</span>
  <span class="na">stage</span><span class="pi">:</span> <span class="s">deploy</span>
  <span class="na">environment</span><span class="pi">:</span> <span class="s">production</span>
  <span class="na">when</span><span class="pi">:</span> <span class="s">manual</span>
  <span class="na">variables</span><span class="pi">:</span>
    <span class="na">JEKYLL_ENV</span><span class="pi">:</span> <span class="s">production</span>
  <span class="na">before_script</span><span class="pi">:</span>
  <span class="pi">-</span> <span class="s">bundle install</span>
  <span class="pi">-</span> <span class="s">apt-get update &amp;&amp; apt-get install -y rsync</span>
  <span class="pi">-</span> <span class="s">umask 0077 &amp;&amp; mkdir -p /root/.ssh</span>
  <span class="pi">-</span> <span class="s">umask 0047 &amp;&amp; echo "${PROD_KNOWN_HOSTS}" &gt;&gt; /root/.ssh/known_hosts</span>
  <span class="pi">-</span> <span class="s">umask 0077 &amp;&amp; echo "${PROD_DEPLOY_KEY}" &gt; /root/.ssh/id_rsa</span>
  <span class="na">script</span><span class="pi">:</span>
  <span class="pi">-</span> <span class="s">bundle exec jekyll build -d public</span>
  <span class="pi">-</span> <span class="s">rsync -crvz --delete-after --delete-excluded public/ "${PROD_USERNAME}@${PROD_HOSTNAME}:"</span>
  <span class="na">artifacts</span><span class="pi">:</span>
    <span class="na">paths</span><span class="pi">:</span>
    <span class="pi">-</span> <span class="s">public</span>
  <span class="na">only</span><span class="pi">:</span>
  <span class="pi">-</span> <span class="s">master</span>
</code></pre></div></div>

<p>Here’s basically how this works:</p>

<ul>
  <li>There’s a basic “test” job, which just confims that everything can actually be built.</li>
  <li>There’s a “pages” job, which is how things get deployed to GitLab Pages. Every commit
on the <code class="language-plaintext highlighter-rouge">master</code> branch goes there automatically.</li>
  <li>There’s a “production” job, which is where the magic happens to deploy my site live:
    <ul>
      <li>Before the build, we make sure we have rsync, and set up the ssh keys
needed for the deploy. The contents of the key files are stored as <a href="https://docs.gitlab.com/ce/ci/variables/README.html">secure
variables</a>.</li>
      <li>We build with the correct <code class="language-plaintext highlighter-rouge">baseurl</code> setting.</li>
      <li>We build with <code class="language-plaintext highlighter-rouge">JEKYLL_ENV=production</code>, so that things like Google
Analytics get wired in.</li>
      <li>We use rsync (with <code class="language-plaintext highlighter-rouge">rrsync</code> set up on the other end) to deploy the site.</li>
    </ul>
  </li>
</ul>]]></content><author><name>pioto</name></author><summary type="html"><![CDATA[It’s been a while since I’ve made any blog posts…]]></summary></entry><entry><title type="html">Random Perl Hacking</title><link href="https://pioto.org/blog/2009/10/random_perl_hacking.html" rel="alternate" type="text/html" title="Random Perl Hacking" /><published>2009-10-20T21:25:25-04:00</published><updated>2009-10-20T21:25:25-04:00</updated><id>https://pioto.org/blog/2009/10/random_perl_hacking</id><content type="html" xml:base="https://pioto.org/blog/2009/10/random_perl_hacking.html"><![CDATA[<p>My day job mostly involves Perl, so I’ve been using it more for my random tasks at home. I’ve now put a few of them up on CPAN:</p>

<ul>
  <li><a href="http://search.cpan.org/~pioto/Unix-Uptime/">Unix::Uptime</a> - Determine the current uptime, in seconds, and load averages, across different *NIX architectures.</li>
  <li><a href="http://search.cpan.org/~pioto/Remind-Client/">Remind::Client</a> - class for working with <a href="https://dianne.skoll.ca/projects/remind/">remind</a>’s daemon mode</li>
</ul>

<p>I also have a few other scripts I’ve been messing around with, for doing some reporting and such:</p>

<ul>
  <li><a href="https://github.com/pioto/pioto-scripts/blob/master/reports/git-author-stats.pl">git-author-stats.pl</a> - Gives a URL to draw a pretty pie chart of the top 10 committers to the current git repository. Examples:
    <ul>
      <li>Exherbo:
        <ul>
          <li><a href="http://chart.apis.google.com/chart?chtt=Top+10+Authors+for+git%3A%2F%2Fgit.exherbo.org%2Fx11.git&amp;chs=650x250&amp;cht=p3&amp;chco=006600&amp;chd=t%3A37.396694214876%2C28.8739669421488%2C16.0640495867769%2C4.59710743801653%2C2.58264462809917%2C1.5495867768595%2C1.39462809917355%2C0.723140495867769%2C0.723140495867769%2C0.671487603305785%2C0.671487603305785%2C4.75206611570248&amp;chl=Ingmar+Vanhassel+(724)%7CAlexander+F%C3%A6r%C3%B8y+(559)%7CBernd+Steinhauser+(311)%7CSaleem+Abdulrasool+(89)%7CBo+%C3%98rsted+Andresen+(50)%7CDavid+Leverton+(30)%7CMarvin+Schmidt+(27)%7CMichael+Forney+(14)%7CBryan+%C3%98stergaard+(14)%7CMike+Kelly+(13)%7CArne+Janbu+(13)%7COther+(92)">::x11</a></li>
          <li><a href="http://chart.apis.google.com/chart?chtt=Top+10+Authors+for+git%3A%2F%2Fgit.exherbo.org%2Fvim.git&amp;chs=650x250&amp;cht=p3&amp;chco=006600&amp;chd=t%3A33.3333333333333%2C20%2C13.3333333333333%2C13.3333333333333%2C6.66666666666667%2C6.66666666666667%2C6.66666666666667%2C0&amp;chl=Ciaran+McCreesh+(5)%7CSaleem+Abdulrasool+(3)%7CIngmar+Vanhassel+(2)%7CAli+Polatel+(2)%7CMarkus+Rothe+(1)%7CHong+Hao+(1)%7CMike+Kelly+(1)">::vim</a></li>
          <li><a href="http://chart.apis.google.com/chart?chtt=Top+10+Authors+for+git%3A%2F%2Fgit.exherbo.org%2Farbor.git+on+multilib&amp;chs=650x250&amp;cht=p3&amp;chco=006600&amp;chd=t%3A30.3276539973788%2C10.9043250327654%2C7.86369593709043%2C7.54914809960682%2C5.66186107470511%2C4.77064220183486%2C4.03669724770642%2C3.6173001310616%2C3.40760157273919%2C3.19790301441678%2C2.59501965923984%2C16.0681520314548&amp;chl=Ingmar+Vanhassel+(1157)%7CBo+%C3%98rsted+Andresen+(416)%7CDavid+Leverton+(300)%7CWulf+C.+Krueger+(288)%7CMike+Kelly+(216)%7CSaleem+Abdulrasool+(182)%7CBryan+%C3%98stergaard+(154)%7CMarkus+Rothe+(138)%7CDaniel+Mierswa+(130)%7CAnders+Ossowicki+(122)%7CCiaran+McCreesh+(99)%7COther+(613)">::arbor’s multilib branch</a></li>
        </ul>
      </li>
      <li><a href="http://chart.apis.google.com/chart?chtt=Top+10+Authors+for+git%3A%2F%2Fgit.pioto.org%2Fpaludis.git&amp;chs=650x250&amp;cht=p3&amp;chco=006600&amp;chd=t%3A66.7058362710537%2C12.7105366235801%2C5.03329416372895%2C3.32941637289463%2C2.7222875048962%2C1.95848021934978%2C1.62553858206032%2C1.27301214257736%2C1.27301214257736%2C0.959655307481394%2C0.411280846063455%2C1.99764982373678&amp;chl=Ciaran+McCreesh+(3406)%7CDavid+Leverton+(649)%7CRichard+Brown+(257)%7CPiotr+Jaroszy%C5%84ski+(170)%7CMike+Kelly+(139)%7CStephen+P.+Bennett+(100)%7CIngmar+Vanhassel+(83)%7CFernando+J.+Pereda+(65)%7CDanny+van+Dyk+(65)%7CBo+%C3%98rsted+Andresen+(49)%7CAli+Polatel+(21)%7COther+(102)">Paludis</a></li>
    </ul>
  </li>
  <li><a href="https://github.com/pioto/pioto-scripts/blob/master/reports/git-daemon-report.pl">git-daemon-report.pl</a> - Given some log file, scrape it stats on who is pulling which of your git repos, and from where. Won’t work unless you run git-daemon with –verbose.</li>
</ul>]]></content><author><name>pioto</name></author><category term="perl" /><category term="hacks" /><summary type="html"><![CDATA[My day job mostly involves Perl, so I’ve been using it more for my random tasks at home. I’ve now put a few of them up on CPAN:]]></summary></entry><entry><title type="html">Migrating from Typo to Movable Type</title><link href="https://pioto.org/blog/2009/05/migrating_from_typo_to_movable.html" rel="alternate" type="text/html" title="Migrating from Typo to Movable Type" /><published>2009-05-30T11:57:45-04:00</published><updated>2009-05-30T11:57:45-04:00</updated><id>https://pioto.org/blog/2009/05/migrating_from_typo_to_movable</id><content type="html" xml:base="https://pioto.org/blog/2009/05/migrating_from_typo_to_movable.html"><![CDATA[<p>I migrated my blog from <a href="http://typosphere.org/">Typo</a> to <a href="http://www.movabletype.org/">Movable Type</a> a while ago. I wrote a little script to do it, but I&#8217;ve only just now gotten around to cleaning it up enough so that it&#8217;s suitable for general use.</p>
<p>It&#8217;s available now from my <a href="https://github.com/pioto/typo2mt">git repo</a>, and on <a href="http://search.cpan.org/~pioto/typo2mt/"><span class="caps">CPAN</span></a></p>
<p>As always, &#8220;patches welcome&#8221;.</p>]]></content><author><name>pioto</name></author><category term="hacks" /><category term="typo" /><category term="perl" /><summary type="html"><![CDATA[I migrated my blog from Typo to Movable Type a while ago. I wrote a little script to do it, but I&#8217;ve only just now gotten around to cleaning it up enough so that it&#8217;s suitable for general use.]]></summary></entry><entry><title type="html">My random old scripts moved to git</title><link href="https://pioto.org/blog/2009/02/my_random_old_scripts_moved_to.html" rel="alternate" type="text/html" title="My random old scripts moved to git" /><published>2009-02-22T10:01:53-05:00</published><updated>2009-02-22T10:01:53-05:00</updated><id>https://pioto.org/blog/2009/02/my_random_old_scripts_moved_to</id><content type="html" xml:base="https://pioto.org/blog/2009/02/my_random_old_scripts_moved_to.html"><![CDATA[<p>So, I had a few random old scripts lying around in <span class="caps">SVN</span>. I&#8217;ve migrated them to git now. Along with my other repos, they&#8217;re browseable at <a href="https://github.com/pioto">https://github.com/pioto</a></p>
<p>Things of interest might be:</p>
<ul>
	<li><a href="https://github.com/pioto/rbtpb">rbtpb</a> &#8211; A replacement for tpb which is hopefully more robust.</li>
	<li><a href="https://github.com/pioto/rubeak">rubeak</a> &#8211; A tool for handling multimedia keyboard keys, and some IR remotes.</li>
</ul>
<p><strong>Update</strong>: fixed links.</p>]]></content><author><name>pioto</name></author><category term="hacks" /><category term="subversion" /><category term="ruby" /><category term="piotoorg" /><category term="git" /><summary type="html"><![CDATA[So, I had a few random old scripts lying around in SVN. I&#8217;ve migrated them to git now. Along with my other repos, they&#8217;re browseable at https://github.com/pioto]]></summary></entry><entry><title type="html">Disk encryption w/ dm-crypt (LUKS) and lvm2, part 4</title><link href="https://pioto.org/blog/2009/02/disk_encryption_w_dm-crypt_luk.html" rel="alternate" type="text/html" title="Disk encryption w/ dm-crypt (LUKS) and lvm2, part 4" /><published>2009-02-07T09:05:19-05:00</published><updated>2009-02-07T09:05:19-05:00</updated><id>https://pioto.org/blog/2009/02/disk_encryption_w_dm-crypt_luk</id><content type="html" xml:base="https://pioto.org/blog/2009/02/disk_encryption_w_dm-crypt_luk.html"><![CDATA[<p><a href="/blog/2009/02/disk_encryption_w_dm-crypt_luks_and_lvm2_part_3.html">Previously</a> I described how to partition your drive using LVM2 and dm-crypt. This time, I&#8217;m going to go over how to boot this system.</p>
<p>First off, you&#8217;re going to want to have your livecd handy, because it&#8217;s likely something won&#8217;t quite be right the first time around. Also, you&#8217;ll want to make sure your kernel is built with support for initramfs. This requires the <code>BLK_DEV_INITRD</code> configure option, named &#8220;Initial <span class="caps">RAM</span> filesystem and <span class="caps">RAM</span> disk (initramfs/initrd) support&#8221; in the &#8220;General setup&#8221; menu. You&#8217;ll then need to specify the location of a source file for the initramfs.</p>
<p>Probably the easiest thing to do is to grab my current <a href="https://github.com/pioto/pioto-initramfs">initramfs package</a> and tweak it to suit your needs. You&#8217;ll at the least need to change some paths in the config.txt and init files. But, it should serve as a good starting point. When you&#8217;re done, put the path to the config.txt file in the &#8220;Initramfs source file(s)&#8221; (<code>CONFIG_INITRAMFS_SOURCE</code>) setting in the kernel.</p>
<p>Now, rebuild and reinstall your kernel, reboot, and pray.</p>
<p>I hope this will help people improve their laptop&#8217;s security. Feel free to post any questions you have in the comments. Good luck!</p>]]></content><author><name>pioto</name></author><category term="encryption" /><category term="paranoia" /><category term="linux" /><category term="hacks" /><summary type="html"><![CDATA[Previously I described how to partition your drive using LVM2 and dm-crypt. This time, I&#8217;m going to go over how to boot this system.]]></summary></entry><entry><title type="html">Disk encryption w/ dm-crypt (LUKS) and lvm2, part 3</title><link href="https://pioto.org/blog/2009/02/disk_encryption_w_dm-crypt_luks_and_lvm2_part_3.html" rel="alternate" type="text/html" title="Disk encryption w/ dm-crypt (LUKS) and lvm2, part 3" /><published>2009-02-07T08:28:22-05:00</published><updated>2009-02-07T08:28:22-05:00</updated><id>https://pioto.org/blog/2009/02/disk_encryption_w_dm-crypt_luks_and_lvm2_part_3</id><content type="html" xml:base="https://pioto.org/blog/2009/02/disk_encryption_w_dm-crypt_luks_and_lvm2_part_3.html"><![CDATA[<p><a href="/blog/2008/12/encrypting_almost_your_entire_1.html">Last time</a> I kinda cheated and gave pretty much a redux of an earlier post. This one will hopefully have some more substance to it.</p>
<p>The partitioning scheme I&#8217;m currently using is like this:</p>
<pre><code>/dev/sda1 - /boot (ext2)
/dev/sda2 - LUKS encrypted lvm2 physical volume</code></pre>
<p>The /boot partition is created like any normal ext2 partition.</p>
<p>The sda2 partition is created like so:</p>
<pre><code>cryptsetup luksFormat /dev/sda2</code></pre>
<p>This usually is sufficient to provide decent encryption, but it is worth checking the documentation for cryptsetup to look for further options &#8212; in particular, the option to use a keyfile.</p>
<p>Once we formatted this partition, we&#8217;ll need to open it, so that we can then add our lvm pv to it:</p>
<pre><code>cryptsetup luksOpen /dev/sda2 sda2_crypt</code></pre>
<p>We&#8217;ll now have a new device available as /dev/mapper/sda2_crypt. This can be treated just like any other block device &#8212; we could just format it as a regular ext3 partition, but then we can&#8217;t really ever resize it. So, we&#8217;re going to make a LVM2 partition:</p>
<pre><code>pvcreate /dev/mapper/sda2_crypt</code></pre>
<p>Now, we create a volume group. I choose &#8216;Exherbo&#8217; as the name, but you can really just use whatever (often people just use &#8216;vg&#8217;).</p>
<pre><code>vgcreate Exherbo /dev/mapper/sda2_crypt</code></pre>
<p>Now, we just need to make our partitions:</p>
<pre><code>lvcreate -L 1G -n swap Exherbo
lvcreate -n root Exherbo
vgscan
vgchange -a y</code></pre>
<p>This creates a 1G swap partition, and uses the rest of the space for our root (/) partition. Again, see the documentation for lvm2 for more options.</p>
<p>Finally, we need to format those partitions:</p>
<pre><code>mkswap /dev/mapper/Exherbo-swap
mke2fs -T ext3 /dev/mapper/Exherbo-root</code></pre>
<p>Next time, I&#8217;ll go over how to boot this system.</p>]]></content><author><name>pioto</name></author><category term="encryption" /><category term="paranoia" /><category term="linux" /><category term="hacks" /><summary type="html"><![CDATA[Last time I kinda cheated and gave pretty much a redux of an earlier post. This one will hopefully have some more substance to it.]]></summary></entry><entry><title type="html">Encrypting (almost) your entire hard drive with dm-crypt (LUKS) and lvm2, Part 2</title><link href="https://pioto.org/blog/2008/12/encrypting_almost_your_entire_1.html" rel="alternate" type="text/html" title="Encrypting (almost) your entire hard drive with dm-crypt (LUKS) and lvm2, Part 2" /><published>2008-12-28T10:16:21-05:00</published><updated>2008-12-28T10:16:21-05:00</updated><id>https://pioto.org/blog/2008/12/encrypting_almost_your_entire_1</id><content type="html" xml:base="https://pioto.org/blog/2008/12/encrypting_almost_your_entire_1.html"><![CDATA[<p><a href="/blog/2008/05/encrypting_almost_your_entire.html">Six months ago</a> I posted an outline for encrypting your system with <span class="caps">LUKS</span>. Well, I figure it&#8217;s about time for me to write up how to actually go about it. In this post, I&#8217;ll outline the necessary kernel configuration.</p>
<p>The basic kernel configuration that I mentioned <a href="/blog/2007/12/encrypting_your_home.html">a long time ago</a> still holds. Basically, you need to have the following options built into your kernel: CONFIG_DM_CRYPT, CONFIG_CRYPTO_CBC, CONFIG_CRYPTO_SHA256, and CONFIG_CRYPTO_AES. Most of those will be turned on when you enable:</p>
<pre>
Device Drivers -&gt;
  Multiple devices driver support (RAID and LVM) -&gt;
    Device mapper support -&gt;
      Crypt target support
</pre>
<p>However, the SHA256 support will not be. It can be found at:</p>
<pre>
Cryptographic API -&gt;
  SHA224 and SHA256 digest algorithm
</pre>
<p>On the note of kernel configuation: for this process, you will need to do a fair amount of work from within another linux environment (most likely a LiveCD). For Gentoo, the most recent CD image I&#8217;ve found that has all the necessary configuration is the 2006.1 version&#8230; As I recall, some of the intermediate minimal CDs, at least, didn&#8217;t possess cryptsetup at all. And the most recent weekly build I tried, while it did have lvm and cryptsetup installed, didn&#8217;t have CONFIG_CRYPTO_SHA256 either built in, or as a module.</p>
<p>Probably the best bet is an <a href="http://www.ubuntu.com/">Ubuntu</a> 8.10 Alternative CD. You&#8217;ll have to either boot in recovery mode, or go through a bit of the installation procedure, as it doesn&#8217;t initially have cryptsetup available. But, once it&#8217;s detected the CD and loaded the modules from it, you can just switch to another virtual console and do things from there.</p>
<p>Next time, I&#8217;ll outline creating the disk partitions.</p>]]></content><author><name>pioto</name></author><category term="linux" /><category term="paranoia" /><category term="hacks" /><category term="encryption" /><summary type="html"><![CDATA[Six months ago I posted an outline for encrypting your system with LUKS. Well, I figure it&#8217;s about time for me to write up how to actually go about it. In this post, I&#8217;ll outline the necessary kernel configuration.]]></summary></entry></feed>